Mudanças entre as edições de "Incubadora de Placas de Petri"
| Linha 35: | Linha 35: | ||
O código Arduino escrito: |
O código Arduino escrito: |
||
{{scroll box| |
{{scroll box| |
||
| + | * Example 01 |
||
| − | #include <LiquidCrystal.h> |
||
| + | * Example 02 |
||
| − | #include <math.h> |
||
| + | * Example 03 |
||
| − | |||
| + | * Example 04 |
||
| − | //Variables// |
||
| + | * Example 05 |
||
| − | |||
| + | * Example 06 |
||
| − | //Electronic system configuration |
||
| + | * Example 07 |
||
| − | int thermistorPin = A0; // Pin where the thermistor is connected |
||
| + | * Example 08 |
||
| − | int minusButton = 9; // Pin where the menu temperature decreasing button is connected |
||
| + | * Example 09 |
||
| − | int plusButton = 10; // Pin where the menu temperature increasing button is connected |
||
| + | * Example 10 |
||
| − | int fanRelay = 11; // Pin where the Relay Module for controlling the fans is connected |
||
| + | * Example 11 |
||
| − | int lampRelay = 12; // // Pin where the Relay Module for controlling the heating lamp is connected |
||
| + | * Example 12 |
||
| − | LiquidCrystal lcd(2, 3, 5, 6, 7, 8); |
||
| + | * Example 13 |
||
| − | |||
| + | * Example 14 |
||
| − | //Operational variables |
||
| − | int standardTemp = 25; // Initial temperature of the Incubator |
||
| − | int maxTemp = 45; // for safety precautions, 45 celsius is the largest value the incubator may have |
||
| − | int minTemp = 20; // temperature arbitrary defined for the minimum temperature setting allowed |
||
| − | int maxHeat = 2; // maximum temperature difference allowed for the current temperature to be higher than the defined by the user |
||
| − | int refreshingRate = 500; // Milliseconds that each loop waits for checking the temp and if the buttons are pressed |
||
| − | |||
| − | //Temperature equation constants |
||
| − | double Beta = 3435; // Beta value (or "B" value) from the thermistor, using the Beta parameter equation, a particular case of the Steinhart–Hart equation for thermistors |
||
| − | double R25 = 10000; // Resistance of the thermistor at 25 celsius |
||
| − | double Ref = 10000; // Resistance of Reference from the Voltage Divider Circuit (10K for example) |
||
| − | |||
| − | //Functions// |
||
| − | |||
| − | void CheckButtons(int plus, int minus){ // Checks if the user press-and-holded one of the two buttons and changes the standardTemp variable. Also refresh the LCD screen for the target temperature |
||
| − | while(digitalRead(plus) == HIGH){ //while the user is pressing the button the target temperature is incremented |
||
| − | if(standardTemp == maxTemp){ // if the standardTemp reaches the maximum temperature allowed it is not incremented anymore |
||
| − | break; |
||
| − | } |
||
| − | standardTemp++; |
||
| − | lcd.setCursor(9, 0); |
||
| − | lcd.print(standardTemp, DEC); |
||
| − | delay(300); // this defines how fast the numbers being set on the LCD screen are changed |
||
| − | } |
||
| − | while(digitalRead(minus) == HIGH){ //while the user is pressing the button the target temperature is decremented |
||
| − | if(standardTemp == minTemp){ // if the standardTemp reaches the minimum temperature allowed it is not decremented anymore |
||
| − | break; |
||
| − | } |
||
| − | standardTemp--; |
||
| − | lcd.setCursor(9, 0); |
||
| − | lcd.print(standardTemp, DEC); |
||
| − | delay(300); // this defines how fast the numbers being set on the LCD screen are changed |
||
| − | } |
||
| − | } |
||
| − | |||
| − | double MeasureResistance(int ARead){ // Transforms pwm values of thermistorPin in voltage and calculates the thermistor resistance by the voltage divider equation |
||
| − | double Rtherm = ((5.0*Ref)/(ARead*(5.0/1023.0))) - Ref; |
||
| − | return Rtherm; |
||
| − | } |
||
| − | |||
| − | int CalculateTemp(double resistance){ //Given the resistance value of the thermistor, returns the temperature by using the thermistor equation for termperature |
||
| − | double T = ((298.0*Beta)/(298.0*log(resistance/R25) + Beta)); // Beta parameter equation, a particular case of the Steinhart–Hart equation for thermistors. Temperature of reference is 25 Celsius. |
||
| − | T = T-273; // converts Kelvin to Celsius |
||
| − | return T; |
||
| − | } |
||
| − | |||
| − | byte degree[8] = { //Generates the "degree" character of the Celsius representation on the LCD screen |
||
| − | B00111, |
||
| − | B00101, |
||
| − | B00111, |
||
| − | B00000, |
||
| − | B00000, |
||
| − | B00000, |
||
| − | B00000, |
||
| − | }; |
||
| − | |||
| − | void setup() { |
||
| − | |||
| − | // LCD stetup // |
||
| − | lcd.begin(16, 2); |
||
| − | lcd.setCursor(0, 0); |
||
| − | lcd.print("Target:"); |
||
| − | lcd.setCursor(11, 0); |
||
| − | lcd.write(byte(degree[8])); |
||
| − | lcd.print("C"); |
||
| − | lcd.setCursor(0, 1); |
||
| − | lcd.print("Status:"); |
||
| − | lcd.setCursor(11, 1); |
||
| − | lcd.write(byte(degree[8])); |
||
| − | lcd.print("C"); |
||
| − | |||
| − | // Pins Setup // |
||
| − | |||
| − | pinMode(plusButton, INPUT); |
||
| − | pinMode(minusButton, INPUT); |
||
| − | |||
| − | pinMode(fanRelay, OUTPUT); |
||
| − | pinMode(lampRelay, OUTPUT); |
||
| − | } |
||
| − | |||
| − | void loop() { |
||
| − | |||
| − | //Data gathering// |
||
| − | |||
| − | CheckButtons(plusButton, minusButton); //Checks for new user inputs |
||
| − | double Rvalue = MeasureResistance(analogRead(thermistorPin)); // The Voltage measured on thermistorPin is converted to Resistance by measureResistance and the temperature is given by calculateTemp, then the LCD is refreshed |
||
| − | int Temp = CalculateTemp(Rvalue); // Returns, in Celsius, the current temperature value; |
||
| − | lcd.setCursor(9, 1); |
||
| − | lcd.print(Temp, DEC); //LCD current temperature refreshing |
||
| − | |||
| − | //Incubator Controlling// |
||
| − | |||
| − | if(Temp < standardTemp){ // if the current temp is lower than the target, it turns on the lamp |
||
| − | digitalWrite(lampRelay, HIGH); |
||
| − | if(digitalRead(fanRelay) == HIGH){ // in case the cooling fans were on, they're shut down |
||
| − | digitalWrite(fanRelay, LOW); |
||
| − | } |
||
| − | } |
||
| − | if(Temp > standardTemp){ // if the current temp is higher than the target, it turns off the lamp |
||
| − | digitalWrite(lampRelay, LOW); |
||
| − | if(Temp >= standardTemp + maxHeat){ // in case the current temperature is too high (defined by maxHeat), the cooling fans are turned on |
||
| − | digitalWrite(fanRelay, HIGH); |
||
| − | } |
||
| − | } |
||
| − | if(Temp == standardTemp && digitalRead(lampRelay) == HIGH){ // in case the current temperature matches the one defined by the user and the lamp is on, it turns it off |
||
| − | digitalWrite(lampRelay, LOW); |
||
| − | } |
||
| − | if(Temp == standardTemp && digitalRead(fanRelay) == HIGH){ // in case the current temperature matches the one defined by the user and the fans are on, it turns them off |
||
| − | digitalWrite(fanRelay, LOW); |
||
| − | } |
||
| − | |||
| − | delay(refreshingRate); //time the microcontroller stays idle until the next check and controlling cycle |
||
| − | } |
||
}} |
}} |
||
Edição das 23h12min de 10 de agosto de 2015

Objetivo
O objetivo desse projeto é criar uma incubadora para cultivo de microorganismos em placas de petri. Com esse equipamento é possível garantir o crescimento nas melhores condições controladas para diferentes tipos de microrganismos. Uma incubadora é um dos equipamentos essenciais para qualquer laboratório de microbilogia ou biologia molecular.
Design
O design da incubadora foi feito para uma estrutura de mdf de 3mm de espessura com encaixes para parafusos de máquina de 10 mm de comprimento e 3,4 mm de diâmetro. O design é baseado no projeto "Incubator" da Biohack Academy e as partes em mdf foram cortadas no Garagem FAB Lab. Uma mudança da funcionalidade do design original foi a colocação de coolers para resfriamento do interior da incubadora caso necessário.
Modelo 3D
O modelo 3D da incubadora foi feito em sketchup. O modelo e sua planificação estão disponíveis para download aqui:
Debugando o Hardware
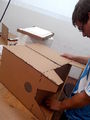
Após cortar na laser percebeu-se que as medidas cortadas foram cerca de 10% maiores do que o esperado. O plano era aproveitar uma caixa de isopor para ser o isolante. Por causa disso foi preciso arrumar placas avulsas de isopor de espessura adequada, o que deu um pouco mais de trabalho. É importante tomar cuidado com as importações para dxf à partir do sketchup. Usamos esse plugin.
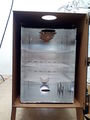
Cobrimos a parte interna com papel alumínimo.
Ficou grande demais!
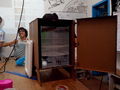
Montando a parte externa.


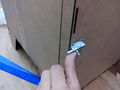
A dobradiça em mdf é bonitinha mas quebra com facilidade. É melhor usar uma dobradiça comercial facilmente encontrável por aí - aproveite e compre uma tranca simples também.
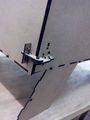
Dobradiça facilmente quebrável.
Tranca comum.


Eletrônica e Elétrica
Usamos um dos clones brasileiros do Arduino mais mão-na-roda do mercado, o Garagino rev1, montando todo o circuito em protoboard. O controle todo é muito simples: um relê controlando o par de coolers de resfriamento, um relê controlando o liga-e-desliga da lâmpada incandescente (que é fonte de aquecimento), um termistor (foi usado um termistor bem não-convencional por questões de disponibilidade, esse aqui) medindo a temperatura, dois botões e um LCD.
O esqueminha eletrônico construído foi o seguinte:

O código Arduino escrito: Predefinição:Scroll box